I had to create a Glogster for an assignment in my Educational Technology class. We could select any topic that we wanted. Since I did a booth at a preparedness night at church on food dehydration I thought I would make my Glogster on that. I need feedback from peers for my written reflection on the assignment so please take a look and share any feedback below in the comments section! Thanks!
Showing posts with label food storage. Show all posts
Showing posts with label food storage. Show all posts
Saturday, April 27, 2013
Wednesday, January 23, 2013
Dried Fruit Snacks
I put some strawberries and bananas in the dehydrator tonight and wanted to share how I dry fruit to make super yummy and all natural fruit snacks.
You need to wash your fruit well and take the time to prep it correctly. Try to make all your slices a uniform thickness so that the food will dry evenly. Any food that turns brown shortly after you cut into it like apples, bananas, or pineapples will need to be treated before they are dried. You can do this by mixing lemon juice and water and tossing the fruit or you can use a commercially available product such as Fruit Fresh. Place the sliced fruit evenly on the drying racks. Leave a little space between each piece so that the air can circulate.


I usually put my fruit in the dehydrator overnight and check it first thing in the morning. You want to make sure it is dried out thoroughly. I like to put mine in a zip lock because I will eat it fairly quickly. You can also vacuum seal it and it will keep for at least 6 months. Enjoy!
You need to wash your fruit well and take the time to prep it correctly. Try to make all your slices a uniform thickness so that the food will dry evenly. Any food that turns brown shortly after you cut into it like apples, bananas, or pineapples will need to be treated before they are dried. You can do this by mixing lemon juice and water and tossing the fruit or you can use a commercially available product such as Fruit Fresh. Place the sliced fruit evenly on the drying racks. Leave a little space between each piece so that the air can circulate.


Sunday, July 1, 2012
How to sauce a tomato
I have been so busy canning this year. One of the easiest things to put up is tomato sauce. I use my Kitchenaid Fruit and Vegetable Strainer attachment to make things go quicker.
Wash tomatoes and then quarter. You may need to cut larger tomatoes into 6 pieces.
Insert the raw, cut tomato into the hopper of the strainer and use the plunger to feed into the strainer.

The good tomato parts come out at the left.The skins, seeds, and cores are discharged into the waste bucket at the right. No fear, this will go to the compost pile :)

Pour the good tomato sauce into large pots and let it simmer until it is reduced by half. This may take 4 or 5 hours, depending on how juicy your tomatoes were. I set a timer and stir about every 7 minutes to make sure nothing is sticking on the bottom of the pot.

I can my sauce using a water bath according to the National Center for Home Food Preservation instructions. This is the only safe source for research based canning information.
My KitchenAid and Attachments make canning so much easier :)
Confessions of the Corn Princess
I nearly overwhelmed myself with corn this year. I put up over 350 ears of corn! Jason has taken to calling me his Corn Princess. I am okay with that :)
I just love Esau corn. For those of you who "ain't from round here", let me educate you for a moment. Chester Esau grows sweet corn down in Dumas, Arkansas. His workers (mostly family) then pick it and put it into sacks. Each sack has about 70 ears of corn in it. You don't have to drive all the way to Dumas to get this golden treat. There are several places around the state who pick it up from Esau's corn shed and resale it. It costs between $18 and $20 a bag and is well worth it!
So how does one go about creaming corn? Here is a step by step guide with pictures:
As soon as you get home with your corn, lay out an old sheet in the middle of your kitchen floor and spread the corn out in a single layer. Yes, it sounds "corny", but you gotta do it. The idea is to cool the corn down so that it doesn't start going bad on you. The quicker you can process your corn after you get it home the better. If it is going to be overnight BE SURE TO DO THIS!!!


Next you need to husk your corn. Just grab a section of tassle and pull toward you. Then pull the opposite side. Be sure and get as much of the silk off as you can resonable remove at this point. Also, I leave the stalk at the bottom to give myself a handle during the cutting process.
Now for the cutting. Get yourself a SHARP knife and a big, clean dishpan. Hold the cob in one hand (by the "handle" if you were paying attention before) in the dishpan. Take your knife and lay it almost horizontal. Then shave the kernels off the cob moving from top to bottom and then rotating the cob to get to the next section. You are trying to only remove about the top 1/3 of the kernel.

On the left side of the cob is what you want. See how the top of the kernel is just shaved off and the rest is sitting there all juicy and glistening? The bottom part is BAD. Do not cut off the whole kernel. You will end up taking some of the cob and your corn will taste, well, cobby. You also won't get any corn cream from those kernels.
Once you have shaved the whole cob, turn your knife over so that the dull part is closest to the cob. You want to be at about at 45 degree angle. Now scrape your knife down the cob. This removes the yummy good stuff inside the kernel. This corn "milk" or "cream" is what makes cream corn. Repeat all around the cob, working from the top to the bottom.
 |
| This picture doesn't show the correct knife angle. I was trying to show what the good stuff looks like as your scrape the cob. |
 |
| This is what the cob looks like after you scrape it. See how the cob is intact and each kernel cell has been excavated? |
 Once you have finished with all your cobs, stir the batch and then spoon into microwave safe bowls. I use my pyrex casserole dishes. Fill each bowl about 3/4 full, cover, and then microwave. You want to cook it for about 5 minutes after it starts bubbling good. This process is called blanching. It halts the enzyematic reaction and keeps your corn tasting fresh.
After the corn is done, remove it from the microwave and immerse the bowl into a tub of ice water to quickly cool it. This is called shocking and stops the cooking process. If you just leave the corn to cool on the counter then it will actually continue to cook the flavor and nutrients out.
Once the corn has cooled, transfer it into labeled freezer bags. It should keep in the freezer for a year.
You can also freeze the corn in the husk for grilling later. Just wrap it tightly in a garbage bag and place in the freezer. It won't last as long as blanched corn, but it is fun to cook on the grill.
If you prefer corn on the cob: Husk, wash and cut your corn to length. Then immerse the corn on the cob into a pot of boiling water for 9 minutes or so (blanching). Remove and place into a pan of ice water (shocking). Drain and place in freezer bags. It should stay good for up to a year in the freezer.
Wednesday, March 7, 2012
"Surely the apple is the noblest of fruits." - Thoreau, Wild Apples

http://www.pickyourown.org/applebutter.htm
I learned that if you pester your wonderful, sweet, adoring, doting, and handsome boyfriend about bringing you apples, he might just bring you more than what you can reasonably deal with in a short amount of time. Especially if you have a pressing project at work and a sickly mother. Anyone need a few apples? ;) After putting up 35 jars of apple sauce and 45 jars of apple butter, I am nearly tired of looking at apples. And I still have enough to can some apple pie filling, dehydrate some apple chips, and make a few pies. After all, "Good apple pies are a considerable part of our domestic happiness." -- Jane Austen.
Sunday, December 5, 2010
Jar Toppers
As promised: How To Make A Jar Topper
I love making things, even though I am not very crafty. These jar toppers are simple to make and make your homemade jams just a little more special.
First you will need fabric. I bought mine at Wal-Mart as a remnant. I was able to get enough fabric for 12 or so toppers for about $1.50.
You will also need string, ribbon, or twine.
Find a rubber band or hair elastic to be an extra set of hands for this project.
Oh, and you will need your sewing scissors.

Cut your fabric to the size you want. Since my fabric was a pattern of squares, I didn't have to measure. I just followed the pattern and cut 6 by 6 squares.

Then fold your fabric in half and then half again. Then clip the raw corner to make it rounded.

Use your rubber band to secure the fabric over your jar and adjust until centered.

Tie the ribbon or twine around the top to secure the fabric in place. Add a decorative label tag if you like. I printed mine from http://www.domestifluff.com/
Roll the rubber band off the bottom and admire your pretty jar!

Jammin'
I recently started making jam. I had an old water bath canner from who knows where in my storage room and thought I would give it a try. I have now made several successful batches of jam. Wanna try?
The most important thing is to gather ALL the ingrediants and tools that you will need. Once things get rolling there isn't time to hunt for anything.

- A jar lifter is essential for picking up and moving hot jars as well as lowering them into the boiling water.
- The lid wand has a magnetic end and is used for picking up lids from the hot water and keeping them sterile. Lids should be kept in hot, but not boiling, water until ready to use. This helps to prepare the sealant on the jar lid to adhere to the jar as well as helps keep the lids clean.
- The measuring tool lets you easily measure the head space. Head space is the distance from the food level to the top of the jar. It is very important to have the correct head space when perserving food. I also use this to removed trapped air from the sides of my jars.
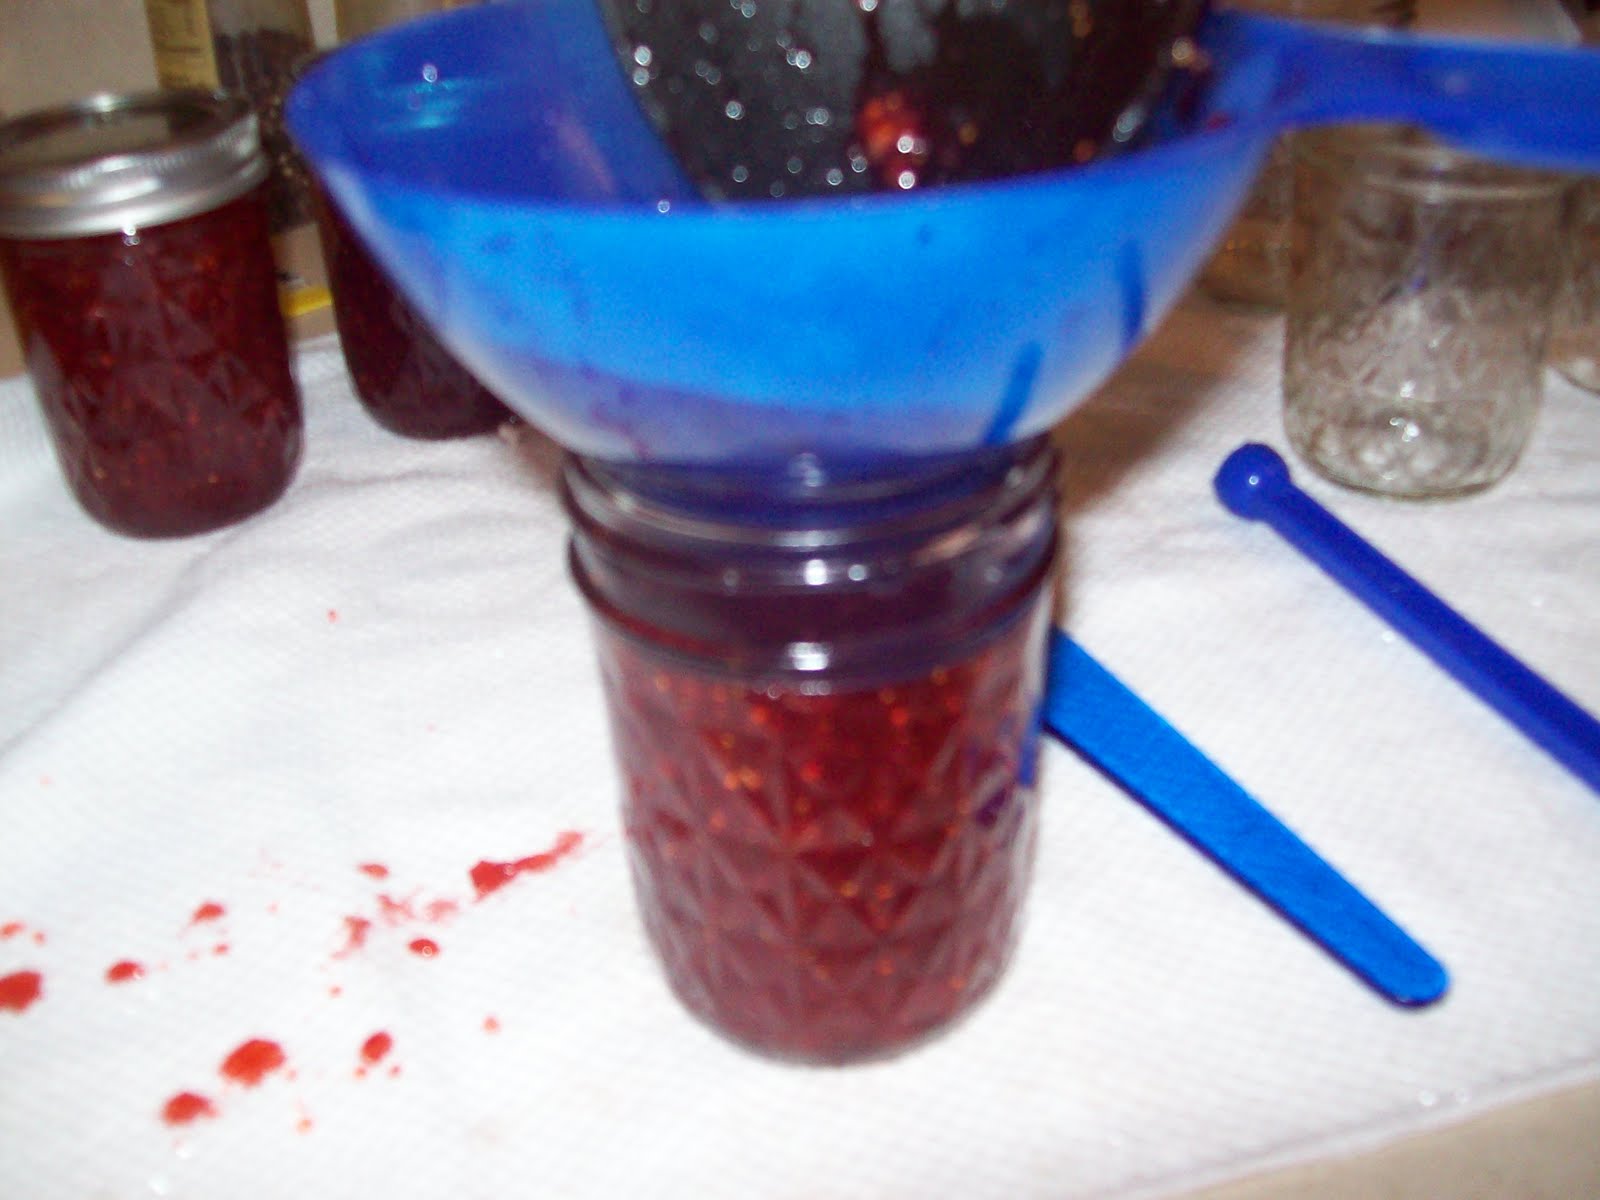
- The wide mouth funnel helps when packing the food into the jar. It is VERY IMPORTANT to keep the top and sides of the jars clean. Otherwise the lids will no seal properly.
You must start with clean jars. Place your clean jars into a boiling water bath for at least 10 minutes. I leave mine in until I am ready to pack them. You always want to pack hot jam into hot jars.
For this jam you will need:
3 pints of strawberries

1/2 tsp butter
If you don't know what a 1/2 tsp of butter looks like then I can't help ya :)
1 package of powered pectin (1.75 ounces)

7 cups of sugar

Wash, drain, and hull your berries. I use a food processer to crush mine, but if you like chunks of fruit in your jam then you can use a potato masher. You will need about 5 cups of crushed berries. Put these in a large, heavy bottomed pot on the stove. Add the butter and pectin.
Heat on high heat, stirring constantly until the mixture comes to a boil. Add the sugar all at once. Contiue stirring until the mixture come to a full rolling boil for 1 minute. Remove from heat and skim the foam off with a spoon.

Using the wide mouth funnel, pack the hot jam into your hot jars, leaving a 1/4 inch headspace. Be certain to wipe any drips of the tops and sides of your jars.

Using the lid wand, remove a lid from your hot (but not boiling) water and place it on the jar.

Screw a band to just hand tight on top of the jar and add to your boiling water bath. Continue until you have filled all jars.
Process the jars for 5 minutes in boiling water. Start timing ONLY after the water has returned to a full boil. The entire jar and lid must be under water. It is important to use a wire rack so keep the jars off the bottom of the bath so that water can circulate all the way around the jar.

Remove the jars from the bath and place right side up on a towel to cool for 24 hours. After 24 hours remove the bands and check the lid for a good seal. Push down on the middle of the lid. It shouldn't give. Try a gentle pull on the lid. It should not come off easily with your finers.
Save your bands and jars for reuse. DO NOT TRY TO REUSE YOUR LIDS. They are made for single use only and may not seal properly a second time. No need to sicken or kill your family for a 10 cent lid.
Enjoy your Strawberry Jam. This recipe makes about 10 half pints.

I plan on making cute jar toppers and labels for my jam. I will post a tutorial on that later on.
The most important thing is to gather ALL the ingrediants and tools that you will need. Once things get rolling there isn't time to hunt for anything.

- A jar lifter is essential for picking up and moving hot jars as well as lowering them into the boiling water.
- The lid wand has a magnetic end and is used for picking up lids from the hot water and keeping them sterile. Lids should be kept in hot, but not boiling, water until ready to use. This helps to prepare the sealant on the jar lid to adhere to the jar as well as helps keep the lids clean.
- The measuring tool lets you easily measure the head space. Head space is the distance from the food level to the top of the jar. It is very important to have the correct head space when perserving food. I also use this to removed trapped air from the sides of my jars.
- The wide mouth funnel helps when packing the food into the jar. It is VERY IMPORTANT to keep the top and sides of the jars clean. Otherwise the lids will no seal properly.
You must start with clean jars. Place your clean jars into a boiling water bath for at least 10 minutes. I leave mine in until I am ready to pack them. You always want to pack hot jam into hot jars.
For this jam you will need:
3 pints of strawberries

1/2 tsp butter
If you don't know what a 1/2 tsp of butter looks like then I can't help ya :)
1 package of powered pectin (1.75 ounces)

7 cups of sugar

Wash, drain, and hull your berries. I use a food processer to crush mine, but if you like chunks of fruit in your jam then you can use a potato masher. You will need about 5 cups of crushed berries. Put these in a large, heavy bottomed pot on the stove. Add the butter and pectin.
Heat on high heat, stirring constantly until the mixture comes to a boil. Add the sugar all at once. Contiue stirring until the mixture come to a full rolling boil for 1 minute. Remove from heat and skim the foam off with a spoon.

Using the wide mouth funnel, pack the hot jam into your hot jars, leaving a 1/4 inch headspace. Be certain to wipe any drips of the tops and sides of your jars.
Using the lid wand, remove a lid from your hot (but not boiling) water and place it on the jar.

Screw a band to just hand tight on top of the jar and add to your boiling water bath. Continue until you have filled all jars.
Process the jars for 5 minutes in boiling water. Start timing ONLY after the water has returned to a full boil. The entire jar and lid must be under water. It is important to use a wire rack so keep the jars off the bottom of the bath so that water can circulate all the way around the jar.

Remove the jars from the bath and place right side up on a towel to cool for 24 hours. After 24 hours remove the bands and check the lid for a good seal. Push down on the middle of the lid. It shouldn't give. Try a gentle pull on the lid. It should not come off easily with your finers.
Save your bands and jars for reuse. DO NOT TRY TO REUSE YOUR LIDS. They are made for single use only and may not seal properly a second time. No need to sicken or kill your family for a 10 cent lid.
Enjoy your Strawberry Jam. This recipe makes about 10 half pints.

I plan on making cute jar toppers and labels for my jam. I will post a tutorial on that later on.
Subscribe to:
Posts (Atom)