
Showing posts with label crafts. Show all posts
Showing posts with label crafts. Show all posts
Monday, December 2, 2013
Christmas Project: Stocking Holder
I am so excited about finally finishing this project! We don't have a mantle in our home. Every year I fight with sticky backed hooks to try to hold heavy stockings to the wall. I usually give in and use nails and then have to patch the holes on January 2nd. Not this year!!!
 I made this darling stocking holder from reclaimed wood, paint, and coat hooks. Additionally I used my Silhouette Cameo to make plastic stencils for the first time. I think it turned out cute. What do you all think? I still need to work on some cuter stockings but these were left from last year.
Saturday, September 21, 2013
Fall Decor: Simple Re-purpose Project
I am starting to put I up my Fall decorations, inside and out. Hopefully I can share some of the ideas I use to inspire someone else.


I found this wreath in one of my Halloween storage tubs.

It was too small for a door wreath and was old and falling apart. I decide to reuse the items on the wreath to fill one of the apothecary jars I made.

I think it turned out pretty cute. And I love that I recycled something that I was going to toss.
What have you re-purposed lately? Share your comments below :)
Sunday, June 23, 2013
Deocrating for Independance Day. Part One
I like to start decorating for July 4th sometime in mid to late June. This allows time to get everything up and enjoy it before it has to come down again. I am going to take the next week or so to share some of these ideas.
Remember those DIY apothecary jars that I made? (click here for tutorial)
Changing out the contents for different holidays and seasons is a simple way to make your home festive. I purchased most of these materials at the Dollar Tree. The first jar is layered color confetti paper in red, white, and blue. The second jar is open top and has red, blue, and silver star garland and has two flags that I picked up at WalMart for about a dollar each. The last jar is another red and blue garland strand.
It is really simple and cheap but is fun and festive.

Up next will be a banner to span across the opening of the doorway!
Sunday, May 19, 2013
Fun With Vinyl
I have been having so much fun since I jumped into the world of vinyl cutting on my Silhouette.
I made this beauty for my mother in law for Mother's Day:

Then tonight I decided to try my hand at personalizing water bottles for some of our nieces.


I used the font Cutie Pop for the purple and pink bottle and the font Handwriting for the blue bottle. All the images are from the Silhouette store. I found the bottles at Hobby Lobby. I am really anxious to see how well these hold up. If they do well then I will be making more, possibly to sell (with different graphics and fonts).
I am just so excited about all the possibilities of things I can do with vinyl. :)
I made this beauty for my mother in law for Mother's Day:

I was surprised by how many people asked if I could make them a sign. I sat down and calculated the cost of all the materials and supplies and finally settled on a price. I am excited that I might actually get to sell some of these!
Then tonight I decided to try my hand at personalizing water bottles for some of our nieces.


I used the font Cutie Pop for the purple and pink bottle and the font Handwriting for the blue bottle. All the images are from the Silhouette store. I found the bottles at Hobby Lobby. I am really anxious to see how well these hold up. If they do well then I will be making more, possibly to sell (with different graphics and fonts).
I am just so excited about all the possibilities of things I can do with vinyl. :)
Sunday, May 12, 2013
Another finished project: Our Photo Wall
After being married for 6 months, I finally put our wedding pictures on the wall! Our photographer did such a wonderful job taking and editing the photos and I wanted to do them justice by displaying them nicely. This is what I finally decided on:
I have wanted some sort of personalized frame to display The Family: A Proclamation to the World for a while. I found this awesome, wide frame at Michael's on sale for less than $10! I ordered the proclamation from the Church website for only 50 cents in an 11 by 17. I framed it and then added Bradley Family and our wedding date in viny cut on my Silhouette. I love this personal touch that shows that we claim the Proclamation on the Family as truth and apply the teachings to our family!
I bought this frame set during Black Friday sale at Walmart for around $6. I chose to put wedding pictures of us and our families in the frames. One of the frames was for a 5x7. I didn't have that size picture printed so I decided to put our initial there instead. I had some matting paper in 5x7 and I cut a B on cardstock using my Silhouette. I just glued it to the mat and used it in the space. Love it!


The view headed down the hall from our main areas to the bedrooms.
 |
Close up view of The Family Proclamation
 |
I bought this frame set during Black Friday sale at Walmart for around $6. I chose to put wedding pictures of us and our families in the frames. One of the frames was for a 5x7. I didn't have that size picture printed so I decided to put our initial there instead. I had some matting paper in 5x7 and I cut a B on cardstock using my Silhouette. I just glued it to the mat and used it in the space. Love it!

Final view of the whole thing as seen from the hallway looking toward the living room.

Wednesday, March 6, 2013
Saint Patrick's Day Decor #3
Remember those apothecary jars that I made? If not, check it out here.
I can use these for every season and holiday by simply changing the contents.
This is how they look for Saint Patrick's Day:


The second jar is filled with white shredded paper and then I used a circle punch to make some circles on a green and white polka dot card stock. I pushed these down and to the side of the jar for just a little green color. Cost: free with scraps I already had lying around.
The third jar is filled with green glass gems that I also found at the Dollar Tree. I used 3 bags so this filler cost $3 but will get reused for something at Easter and Christmas. :)
Total cost for fillers for 3 jars: $4. What an inexpensive, fun way to decorate for March!
I can use these for every season and holiday by simply changing the contents.
This is how they look for Saint Patrick's Day:

Here is a closer look at the contents of the jars:

I filled the first jar with cheap, shiny, shamrock garland that I picked up at the Dollar Tree for $1. The second jar is filled with white shredded paper and then I used a circle punch to make some circles on a green and white polka dot card stock. I pushed these down and to the side of the jar for just a little green color. Cost: free with scraps I already had lying around.
The third jar is filled with green glass gems that I also found at the Dollar Tree. I used 3 bags so this filler cost $3 but will get reused for something at Easter and Christmas. :)
Total cost for fillers for 3 jars: $4. What an inexpensive, fun way to decorate for March!
Saturday, March 2, 2013
Saint Patrick's Day Decor #2
I think there should be a banner for every holiday in our home. I don't have a mantle, but I do have a shelf above the doorway between the living room and kitchen. It makes a perfect place to hang holiday banners.


I kept this banner really simple. I cut white card stock on my Silhouette Cameo. I then used the same shape but reduced the size to cut this pretty green polka dot from patterned paper. I cut the letters on black card stock using the Harrington font in Silhouette Studio. Then I glued it all together. I used a glue stick for the two banner shapes. I found a glue pen is easiest for the letters. I used a single hole punch to punch holes on each side of the banner piece and then strung a ribbon to hang the banner. Easy, simple way to bring festive to your home!


I kept this banner really simple. I cut white card stock on my Silhouette Cameo. I then used the same shape but reduced the size to cut this pretty green polka dot from patterned paper. I cut the letters on black card stock using the Harrington font in Silhouette Studio. Then I glued it all together. I used a glue stick for the two banner shapes. I found a glue pen is easiest for the letters. I used a single hole punch to punch holes on each side of the banner piece and then strung a ribbon to hang the banner. Easy, simple way to bring festive to your home!
Friday, March 1, 2013
Saint Patrick's Day Decor #1
I want to share some ways that I am decorating our home for Saint Patrick's Day. Today is Day 1 and combines a family activity with some easy decorating.
This is the inside of the door going to our garage. This is the door we go out most often and so I chose this location for our activity. I made a simple sign and then used my Silhouette to cut out four leaf clovers on green card stock.

The idea is that the family comes together and talks about their blessings. Then you write a blessing on each clover and sticky tack it to the door.
We used a gold Sharpie to write one word blessings such as family, love, faith, home, etc...
This would probably be MUCH MORE fun with kids instead of a grumpy husband who thinks it is silly. But still, it did get us thinking about our blessings, which was the main point of the activity :)
DIY Apothecary Jars for Cheap
I have been wanting some apothecary jars, but even on sale they are a bit more than what I want to spend. So tonight I made a couple from glass jars and candle sticks. It is a really easy project!
First, find some glass jars that you like.
I found this one on sale for 50% off regular price at Hobby Lobby. It was only $5!


I spent a total of $13 to make two apothecary jars!
Tomorrow I will post some ideas on how to decorate with them!
First, find some glass jars that you like.
I found this one on sale for 50% off regular price at Hobby Lobby. It was only $5!
I then found this little open top jar at the Dollar Tree for, wait for it, $1 :)

I found matching candlesticks on sale, 50% off regular price, at Hobby Lobby for $3.50 each.
I used E6000 glue that I already had at home to glue the jars to the candlesticks. Just spread a thin bead of glue to the top of the candlestick and then set the jar on top, making sure the jar is centered. Then leave it alone to set overnight and VOILA:

I spent a total of $13 to make two apothecary jars!
Tomorrow I will post some ideas on how to decorate with them!
Thursday, January 31, 2013
Making a word art using Wordle
Every now and then I learn something at school that I think it pretty cool. This week in my Educational Technology class we learned about making word art using Wordle. Part of the assignment was to reflect on how we might use this in our classrooms when we become teachers. I think it is a great idea for a classroom or even for use at home with kids. I am including my completed assignment along with a summary reflection with some ideas on how word art activities could be educational and fun.


Reflection of Word Art activity:
This word activity relates back to
ISTE NETST by incorporating several of the standards we discussed in class. For
example the activity worked to inspire student learning and creativity. This
was done by the student picking their own descriptive words and then being able
to creatively choose how those words would be displayed. It also served to
design and develop digital age learning experiences and assessments and also
modeled digital age work and learning. The processes encouraged students to
collaborate with one another on ideas for words and also to communicate by
assisting other students who were not as familiar with technology. This also
provided an opportunity to promote and model digital citizenship and
responsibility by allowing students to work together without them violating
academic honesty or stealing intellectual property.
I would use this word art activity in several ways in my
middle school classroom. A few examples:
1.
working in a small group, develop a word art
using 15 vocabulary words from a science chapter on cell division. Be prepared
to define a few of the words when your group presents the word art to the
class. (ex: earth science astronomy words: orbit, galaxy, rotation,
constellation, …)
2.
develop a word art using words to summarize the
plot of a book as the cover page of a
book report. (ex: The Hunger Games words: Kat, lottery, game, poverty, laws,
danger, teamwork, …)
3.
develop a word art using the order of operations
words for a math class review. ( ex: multiply, divide, parenthesis, additions,
…)
4.
develop a word art using 10 positive words from
the classroom rules at the beginning of the school year. (examples of words: listen, help, prepared, prompt, kind,
attentive, …)
Think of fun ways you can use Wordle to create word art with your children or students. It is also just plain fun. I am thinking about creating a word art and using my Silhouette to cut it in vinyl. Maybe one with a family theme for the living room or food words for the kitchen? Share your ideas in the comment section below :)
Thursday, January 10, 2013
To organize your craft paints
I am continuing with my create room organization series with this dandy idea.
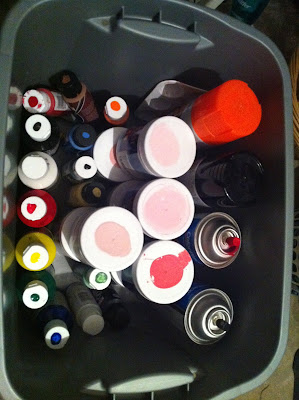

I keep my bottles of craft paint in a tub. This keeps any leaking paints contained. I used a swab to put a dot of paint on top of each lid so I can tell at a glance down into the tub which paint I want. Give it a try for your paints :)
Wednesday, January 9, 2013
My create room organization tips
I have been working for a while on my create room. I am calling it the create room because it serves so many functions. It is the place that I do all my sewing and my crafting. It is also where I store all my home canned goods and the tools used for canning. So this room needs to accommodate everything from a pressure canner and food dehydrator to paint and glitter and a desk for our office supplies.
This is still a work in progress but I wanted to share a few snippets of what I am using to organize my create room.
I saw a great idea on Pinterest to use those over the door shoe holders to store all kinds of other things. It works great to keep the things I use most visible and within arms reach. This is on OUTSIDE of the closet door in my create room:


 Further down I keep my scrap fabrics and my patterns. I have found it easier to keep my cut patterns in zip lock bags with the original envelope shown in the front. I can never get the patterns folded back just right to go into the paper envelope.

This is still a work in progress but I wanted to share a few snippets of what I am using to organize my create room.
I saw a great idea on Pinterest to use those over the door shoe holders to store all kinds of other things. It works great to keep the things I use most visible and within arms reach. This is on OUTSIDE of the closet door in my create room:


I am also using a dresser in this room. My scanner/printer is placed on top. (Ignore the other stuff... it is for a project I am working on).
 Since the printer is there I decided to use the top two drawers for my paper storage. I keep my plain printer paper here. I also keep my card stock, decorative papers, greeting cards, and photo paper here.


I am hoping to have the whole room ready to share soon. It is at least functional now :)
Saturday, December 1, 2012
Easy Homemade Christmas Ornaments
Last year I was really needing more ornaments for my tree but hadn't budgeted for them so I needed to be creative and use something that I already had on hand. This is one of my ideas.
Old Christmas cards with beautiful pictures and canning lids
I painted the lids on both sides. Then I used the inside of a canning jar band as a template and traced the part of the card that I wanted to use. I used the smallest diameter of the band so that I would have the painted lid as a sort of frame. I cut out the circles and glued them to the lid. I then hot glued a loop of ribbon onto the back so that it could be hung on the tree.
How easy is that? And I repurposed items that I already had so it was FREE :)
Here are a few of my favorites:


These could be made with any picture or just decorated with paint and glitter. I like the home made Christmas feel of them and it was great to be able to use the Christmas cards that were sent to me in such a permanent and beautiful way. You could even mark who sent the card on the back of the ornament. I always date any new ornaments we put on our tree so we can remember when and how we aquired them. Let your creativity take over and make some of these for your tree.
Merry Christmas :)
Thursday, November 15, 2012
The Reception Decorations
 |
| The tables were covered with white table clothes. The centerpieces are more sunflower, mason jar, and burlap. The clear plates were set on top of sunflower yellow doilies. |
 |
| The head table with these cute signs and yellow linen table clothes draped diagonally. |
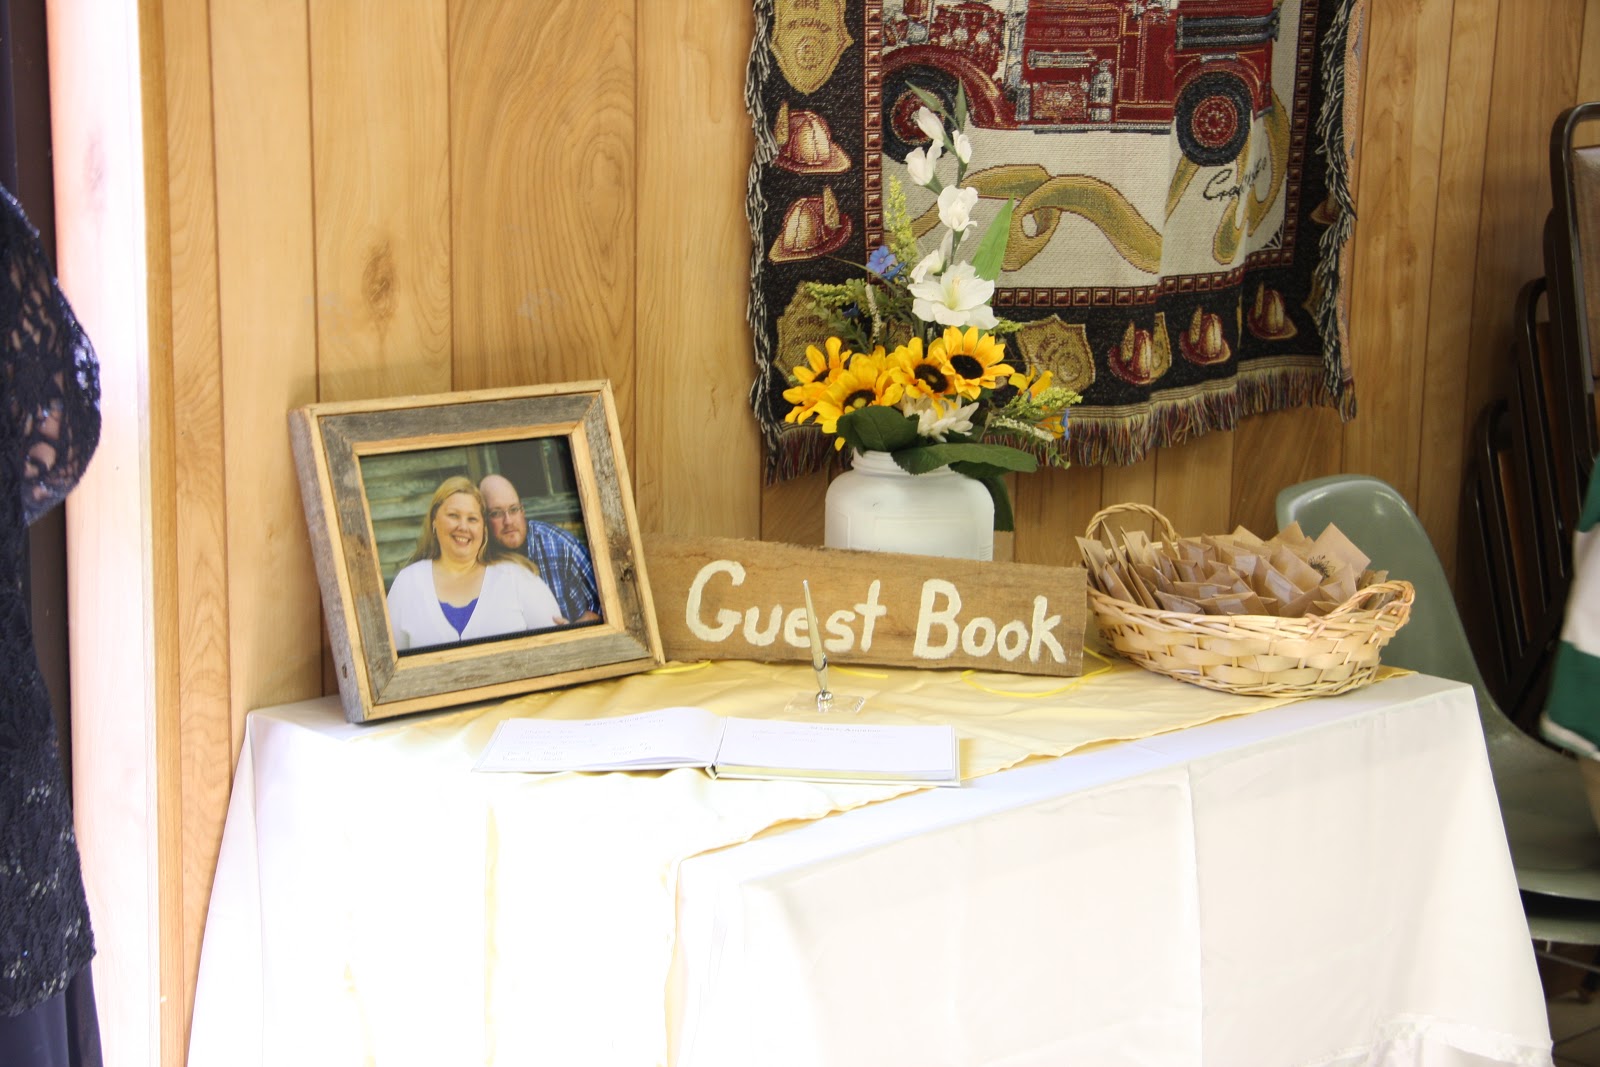 |
| The guest book table: We put one of our engagement photos in a frame made of weathered barn wood. The Guest Book sign is wooden and made by a friend. The basket contains the bird seed packets that I made. |
 |
| I stamped plain brown mini bags with sunflower and love bird stamps. I purchased the stamps and bags at Michael's. I used a tiny piece of tape to seal the back of the bag. |
 |
| The gift table had a cute white basket for cards and had another engagement photo displayed. It also had a larger flower arrangement. This was placed one one side of the front door, opposite the guest book, so that our guest could unload the gifts without having to carry them across the room while greeting family and friends. |
 |
| The cake table had the same yellow linen that was on the head dining table. We also served after dinner mints and chocolate mints along with the cakes. We displayed another engagement photo here. The toasting glasses were tied with jute and we toasted with sparkling apple cider. |
 |
| The beautiful cake was so perfect for our wedding. I loved the detail on the cake and then the sunflower and burlap around the center section. |
 |
| The groom's cake. We are both huge Walking Dead fans so we both liked this. Jason's comment to everyone was, "We are married until one of us turns to dust. Luckily I married a clean freak!" :) |
 |
| Our menu featured beans and cornbread, mini corn dogs, cheese balls and crackers, veggie platters with dip, and little cocktail wieners. Jason made the beans and they were the best I have ever had. He got many compliments on them. |
 |
| We made favor bags with tulle and candy corn. I thought that was cute for a fall wedding. These were put into small metal buckets and placed on each table. |
I am so happy with how beautifully the reception hall turned out. It was a great time to visit with our family and friends and celebrate our marriage.
Wednesday, November 14, 2012
Wedding Decorations
We got our wedding pictures back and they are fantastic! I wanted to do a post about some of the decorations that I made. Maybe this will spark ideas for other brides to be who are working on a very limited budget and want to DIY the decorations.
Our theme was sunflowers and burlap. We wanted to do a rustic, simple, country wedding but didn't want it to go to far into the rednecky country way.
Here is how it turned out:
 This was the setting for the ceremony, to give you some perspective. It is a little wooden chapel on land owned by Mr. Bob Abbot in Rison, Arkansas. He was kind enough to let us use it for our wedding. The chapel is surrounded by trees and has a lake behind it.


I made the wreath above the door by hot gluing sunflowers onto a vine wreath and hanging the letter with jute. The B is my new last name initial :) Looking back I should have wired them on so I could change them out easier for other flowers for different seasons. The idea was to use things that could then be reused in our home decor.
We used sunflowers arranged in mason jars and hung them on shepherds hooks along the brick walkway and on the picket fence. A friend of mine made some of these for her daughter's wedding and was kind enough to share with me.


Our theme was sunflowers and burlap. We wanted to do a rustic, simple, country wedding but didn't want it to go to far into the rednecky country way.
Here is how it turned out:


I made the wreath above the door by hot gluing sunflowers onto a vine wreath and hanging the letter with jute. The B is my new last name initial :) Looking back I should have wired them on so I could change them out easier for other flowers for different seasons. The idea was to use things that could then be reused in our home decor.
We used sunflowers arranged in mason jars and hung them on shepherds hooks along the brick walkway and on the picket fence. A friend of mine made some of these for her daughter's wedding and was kind enough to share with me.


The groom wanted to showcase his "ostrich of love" in the courtyard of the chapel. So I added a cheap veil and bow tie to them. It added a touch of whimsy :)
For the inside of the chapel I kept it very very simple and minimalist. The rustic chapel was such a naturally beautiful place to me. And the view of the lake through the picture window at the front was amazing! Since the chapel has no electricity, the window and the double doors being opened provided natural sunlight on the chilly October morning.

This is a stunning view.
 |
| The wooden pews were fabulous so I just alterenated a candle arrangement and a flower arrangement on the floor at the end of each pew along the center. |


The candle arrangement is a quart mason jar, wrapped with a piece of burlap and a sunflower. The candle stick holder is an antique design and fits onto the mason jar. The sunflower arrangement is just a pint mason jar with burlap gathered around it and tied with twine.

I made this sunflower ball by low temp hot gluing sunflowers to an 18 inch Styrofoam ball.This was probably the single most expensive thing I made due to the cost of the Styrofoam and the flowers. I glued a small loop of twine to the top and we hung it with more twine around the rafter right above where we stood to say our vows. It added a beautiful pop of color. It was almost like standing under mistletoe when we kissed :)

We used a simple white isle runner and the flower girl tossed yellow flowers. I bought cheap yellow flowers and took them apart to make her petals because I could not find yellow petals anywhere! Turns out this way was much cheaper and they fell really well.
Our unity candle was another thing that I made because I could not find what I wanted. I bought an inexpensive candle set and decorated them to the theme of the wedding. I wrapped each taper candle with a strip of burlap and then wrapped the unity candle in burlap. I glued a wooden heart to the burlap. Voila! I also made the stand the unity candle is sitting on by taking the same type of taper candle holder and using E6000 glue to attach a glass pillar candle plate. I think it turned out cute!


The bouquets were sunflowers with greenery and tied with burlap bows. The beautiful young lady next to me in my baby sister and Matron of Honor. You will see more of her in another post about our wedding later on...
I hope our ceremony decorations helped to spark some creative ideas for you. I will be doing a separate post on the reception decorations soon!
Subscribe to:
Posts (Atom)