Search This Blog

Showing posts with label homemaking. Show all posts

Sunday, June 29, 2014

Homemade Powdered Laundry Detergent


I posted a recipe several years ago for a liquid homemade laundry detergent. I used it for several years because I generally prefer liquid detergent, but I find the powdered version is SO much easier to make and to store.
You will need:
1 bar of Zote soap
3 cups of washing soda
3 cups of borax
 
All you have to do to make the detergent is grate the soap. You can use a cheese grater but I prefer to use the grate blade in my food processor. Once the soap is grated I switch to the all purpose blade to mix the washing soda and borax in with the soap. I find this better than hand mixing because the blade removes all the clumps and make the powder finer, so it dissolves faster in my washing machine.
This is what it should look like after mixing:
 
Keep it in an air tight container. Otherwise moisture in the air may make it clump. A label is always a good idea as well. :)
Add 1 tablespoon for normal loads and 2 tablespoons for large or really dirty loads. I always start my water first, then add the powder, and then add the laundry.
 
This recipe works fine in HE washers as well as my old fashioned top loader.
 
Enjoy!

Saturday, September 21, 2013

Fall Decor: Simple Re-purpose Project

I am starting to put I up my Fall decorations, inside and out. Hopefully I can share some of the ideas I use to inspire someone else.

I found this wreath in one of my Halloween storage tubs.
 
It was too small for a door wreath and was old and falling apart. I decide to reuse the items on the wreath to fill one of the apothecary jars I made. 

 
I think it turned out pretty cute. And I love that I recycled something that I was going to toss.
What have you re-purposed lately? Share your comments below :)

Sunday, June 23, 2013

Deocrating for Independance Day. Part One

I like to start decorating for July 4th sometime in mid to late June. This allows time to get everything up and enjoy it before it has to come down again.  I am going to take the next week or so to share some of these ideas.

Remember those DIY apothecary jars that I made? (click here for tutorial)
Changing out the contents for different holidays and seasons is a simple way to make your home festive.  I purchased most of these materials at the Dollar Tree.  The first jar is layered color confetti paper in red, white, and blue. The second jar is open top and has red, blue, and silver star garland and has two flags that I picked up at WalMart for about a dollar each. The last jar is another red and blue garland strand.
It is really simple and cheap but is fun and festive.

Up next will be a banner to span across the opening of the doorway!

Sunday, May 12, 2013

Another finished project: Our Photo Wall

After being married for 6 months, I finally put our wedding pictures on the wall! Our photographer did such a wonderful job taking and editing the photos and I wanted to do them justice by displaying them nicely. This is what I finally decided on:
 
The view headed down the hall from our main areas to the bedrooms.
 
Close up view of The Family Proclamation
I have wanted some sort of personalized frame to display The Family: A Proclamation to the World for a while. I found this awesome, wide frame at Michael's on sale for less than $10! I ordered the proclamation from the Church website for only 50 cents in an 11 by 17. I framed it and then added Bradley Family and our wedding date in viny cut on my Silhouette. I love this personal touch that shows that we claim the Proclamation on the Family as truth and apply the teachings to our family!


I bought this frame set during Black Friday sale at Walmart for around $6. I chose to put wedding pictures of us and our families in the frames. One of the frames was for a 5x7. I didn't have that size picture printed so I decided to put our initial there instead. I had some matting paper in 5x7 and I cut a B on cardstock using my Silhouette. I just glued it to the mat and used it in the space. Love it!
 
Final view of the whole thing as seen from the hallway looking toward the living room.
 

Wednesday, March 6, 2013

Saint Patrick's Day Decor #3

Remember those apothecary jars that I made? If not, check it out here.

I can use these for every season and holiday by simply changing the contents.
This is how they look for Saint Patrick's Day:
 
 
Here is a closer look at the contents of the jars:
 

I filled the first jar with cheap, shiny, shamrock garland that I picked up at the Dollar Tree for $1.
The second jar is filled with white shredded paper and then I used a circle punch to make some circles on a green and white polka dot card stock. I pushed these down and to the side of the jar for just a little green color. Cost: free with scraps I already had lying around.
The third jar is filled with green glass gems that I also found at the Dollar Tree. I used 3 bags so this filler cost $3 but will get reused for something at Easter and Christmas. :)
Total cost for fillers for 3 jars: $4.  What an inexpensive, fun way to decorate for March!

Saturday, March 2, 2013

Saint Patrick's Day Decor #2

I think there should be a banner for every holiday in our home. I don't have a mantle, but I do have a shelf above the doorway between the living room and kitchen. It makes a perfect place to hang holiday banners.


I kept this banner really simple. I cut white card stock on my Silhouette Cameo. I then used the same shape but reduced the size to cut this pretty green polka dot from patterned paper. I cut the letters on black card stock using the Harrington font in Silhouette Studio. Then I glued it all together. I used a glue stick for the two banner shapes. I found a glue pen is easiest for the letters. I used a single hole punch to punch holes on each side of the banner piece and then strung a ribbon to hang the banner. Easy, simple way to bring festive to your home!


Friday, March 1, 2013

DIY Apothecary Jars for Cheap

I have been wanting some apothecary jars, but even on sale they are a bit more than what I want to spend. So tonight I made a couple from glass jars and candle sticks. It is a really easy project!
First, find some glass jars that you like.
I found this one on sale for 50% off regular price at Hobby Lobby. It was only $5!

I then found this little open top jar at the Dollar Tree for, wait for it, $1  :)


I found matching candlesticks on sale, 50% off regular price, at Hobby Lobby for $3.50 each.
 
I used E6000 glue that I already had at home to glue the jars to the candlesticks. Just spread a thin bead of glue to the top of the candlestick and then set the jar on top, making sure the jar is centered. Then leave it alone to set overnight and VOILA:


I spent a total of $13 to make two apothecary jars!

Tomorrow I will post some ideas on how to decorate with them!


Thursday, January 10, 2013

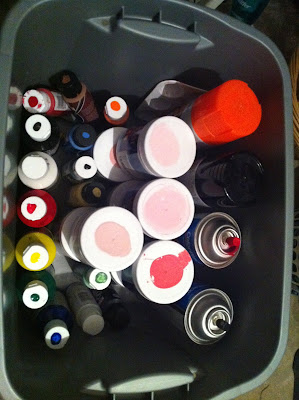
To organize your craft paints

I am continuing with my create room organization series with this dandy idea.

I keep my bottles of craft paint in a tub. This keeps any leaking paints contained. I used a swab to put a dot of paint on top of each lid so I can tell at a glance down into the tub which paint I want. Give it a try for your paints :)

Wednesday, January 9, 2013

My create room organization tips

I have been working for a while on my create room. I am calling it the create room because it serves so many functions. It is the place that I do all my sewing and my crafting. It is also where I store all my home canned goods and the tools used for canning. So this room needs to accommodate everything from a pressure canner and food dehydrator to paint and glitter and a desk for our office supplies.

This is still a work in progress but I wanted to share a few snippets of what I am using to organize my create room.

I saw a great idea on Pinterest to use those over the door shoe holders to store all kinds of other things.  It works great to keep the things I use most visible and within arms reach. This is on OUTSIDE of the closet door in my create room:


I am also using a dresser in this room. My scanner/printer is placed on top. (Ignore the other stuff... it is for a project I am working on).


Since the printer is there I decided to use the top two drawers for my paper storage. I keep my plain printer paper here. I also keep my card stock, decorative papers, greeting cards, and photo paper here.
Further down I keep my scrap fabrics and my patterns. I have found it easier to keep my cut patterns in zip lock bags with the original envelope shown in the front. I can never get the patterns folded back just right to go into the paper envelope.

 
I am hoping to have the whole room ready to share soon. It is at least functional now :)

Monday, December 3, 2012

Best Holiday Decorating Tool, ever!

These little clips are great. They are like Command hooks except they are made for hanging garland, lights, ribbon, etc. indoors. I use them to hang garland on my entertainment credenza. I would NEVER consider using tape or tacks on my favorite piece of living room furniture so these work great. I used them last year and they didn't leave any mark when I removed them after Christmas. And the adhesive back is replaceable. I have to go get more of the backs tomorrow so I can finish up my living room. Give these a try.

Saturday, December 1, 2012

Easy Homemade Christmas Ornaments

Last year I was really needing more ornaments for my tree but hadn't budgeted for them so I needed to be creative and use something that I already had on hand. This is one of my ideas.

Old Christmas cards with beautiful pictures and canning lids

I painted the lids on both sides. Then I used the inside of a canning jar band as a template and traced  the part of the card that I wanted to use. I used the smallest diameter of the band so that I would have the painted lid as a sort of frame. I cut out the circles and glued them to the lid. I then hot glued a loop of ribbon onto the back so that it could be hung on the tree.

How easy is that? And I repurposed items that I already had so it was FREE :) 

Here are a few of my favorites:

 
These could be made with any picture or just decorated with paint and glitter. I like the home made Christmas feel of them and it was great to be able to use the Christmas cards that were sent to me in such a permanent and beautiful way. You could even mark who sent the card on the back of the ornament. I always date any new ornaments we put on our tree so we can remember when and how we aquired them. Let your creativity take over and make some of these for your tree.
 
Merry Christmas :)

Monday, November 5, 2012

Best baseboard cleaner, ever!

I tackled my kitchen baseboards today. I have been needing to do it for a while but putting it off. I found a floor grease cutter cleaner recipe on Pinterest several weeks ago and was pretty excited to try it out today. I decided to mix up a batch and clean the baseboards before I started on the kitchen floor.
All I can say is WOW!!!!  This stuff works great! Best baseboard cleaning session I have ever had the pleasure of enduring :)
I also used it to mop my kitchen floor and have mixed results. I made a fresh batch for the floors and think that I might have gone a little heavy on the dish soap because I had mega suds and needed to rinse the floor afterward. But it still did a pretty darn good job on cleaning my old vinyl kitchen floor!

Here is the recipe:
Place all the ingredients into a bucket and mix well until sudsy.
Not recommended for waxed floors--it may make the wax gunky

Give it a try and comment below how it worked for you!

Saturday, September 15, 2012

Powdered Laundry Detergent

In the past I have made and used liquid homemade laundry soap. You can find the liquid recipe here. 

Recently I made a batch of the powdered laundry soap. The powder uses the same dry ingredients and amounts as the liquid, but takes up much less room to store. I haven't had any problems with it clumping on my clothes, even when washing in cold water. I use about 2 tablespoons for a large load. Even using coupons, I find this much cheaper than any store bought detergent and it works VERY well. Because it is non-sudsy, it works fine in regular and HE washers. :)


Sunday, July 1, 2012

How to sauce a tomato

I have been so busy canning this year. One of the easiest things to put up is tomato sauce. I use my Kitchenaid Fruit and Vegetable Strainer attachment to make things go quicker.

Wash tomatoes and then quarter. You may need to cut larger tomatoes into 6 pieces.

Insert the raw, cut tomato into the hopper of the strainer and use the plunger to feed into the strainer.


The good tomato parts come out at the left.The skins, seeds, and cores are discharged into the waste bucket at the right. No fear, this will go to the compost pile :)

Pour the good tomato sauce into large pots and let it simmer until it is reduced by half. This may take 4 or 5 hours, depending on how juicy your tomatoes were. I set a timer and stir about every 7 minutes to make sure nothing is sticking on the bottom of the pot.

I can my sauce using a water bath according to the National Center for Home Food Preservation instructions. This is the only safe source for research based canning information.

My KitchenAid and Attachments make canning so much easier :)

Confessions of the Corn Princess


I nearly overwhelmed myself with corn this year. I put up over 350 ears of corn! Jason has taken to calling me his Corn Princess.  I am okay with that :)
I just love Esau corn. For those of you who "ain't from round here", let me educate you for a moment. Chester Esau grows sweet corn down in Dumas, Arkansas. His workers (mostly family) then pick it and put it into sacks. Each sack has about 70 ears of corn in it. You don't have to drive all the way to Dumas to get this golden treat. There are several places around the state who pick it up from Esau's corn shed and resale it. It costs between $18 and $20 a bag and is well worth it!

So how does one go about creaming corn? Here is a step by step guide with pictures:
As soon as you get home with your corn, lay out an old sheet in the middle of your kitchen floor and spread the corn out in a single layer. Yes, it sounds "corny", but you gotta do it. The idea is to cool the corn down so that it doesn't start going bad on you. The quicker you can process your corn after you get it home the better. If it is going to be overnight  BE SURE TO DO THIS!!!

Next you need to husk your corn. Just grab a section of tassle and pull toward you. Then pull the opposite side. Be sure and get as much of the silk off as you can resonable remove at this point. Also, I leave the stalk at the bottom to give myself a handle during the cutting process.

Wash your corn under cool, running water. Remove any silk that may still be on the cob. A small nail brush works well for this. Just label it and keep it for this purpose only.

Now for the cutting. Get yourself a SHARP knife and a big, clean dishpan.  Hold the cob in one hand (by the "handle" if you were paying attention before) in the dishpan. Take your knife and lay it almost horizontal. Then shave the kernels off the cob moving from top to bottom and then rotating the cob to get to the next section. You are trying to only remove about the top 1/3 of the kernel.

On the left side of the cob is what you want. See how the top of the kernel is just shaved off and the rest is sitting there all juicy and glistening?  The bottom part is BAD. Do not cut off the whole kernel. You will end up taking some of the cob and your corn will taste, well, cobby. You also won't get any corn cream from those kernels.

Once you have shaved the whole cob, turn your knife over so that the dull part is closest to the cob. You want to be at about at 45 degree angle. Now scrape your knife down the cob. This removes the yummy good stuff inside the kernel. This corn "milk" or "cream" is what makes cream corn. Repeat all around the cob, working from the top to the bottom.
This picture doesn't show the correct knife angle. I was trying to show what the good stuff looks like as your scrape the cob.

This is what the cob looks like after you scrape it. See how the cob is intact and each kernel cell has been excavated?

Once you have finished with all your cobs, stir the batch and then spoon into microwave safe bowls. I use my pyrex casserole dishes. Fill each bowl about 3/4 full, cover, and then microwave. You want to cook it for about 5 minutes after it starts bubbling good. This process is called blanching. It halts the enzyematic reaction and keeps your corn tasting fresh.
After the corn is done, remove it from the microwave and immerse the bowl into a tub of ice water to quickly cool it. This is called shocking and stops the cooking process. If you just leave the corn to cool on the counter then it will actually continue to cook the flavor and nutrients out.

Once the corn has cooled, transfer it into labeled freezer bags. It should keep in the freezer for a year.

 You can also freeze the corn in the husk for grilling later. Just wrap it tightly in a garbage bag and place in the freezer. It won't last as long as blanched corn, but it is fun to cook on the grill.

If you prefer corn on the cob: Husk, wash and cut your corn to length. Then immerse the corn on the cob into a pot of boiling water for 9 minutes or so (blanching). Remove and place into a pan of ice water (shocking).  Drain and place in freezer bags. It should stay good for up to a year in the freezer.

Friday, June 22, 2012

Shaker jar cleaner


One of the best all around cleaners in the home is baking soda. And if you need to wet the baking soda, use H2O2 (hydrogen peroxide for you non-science folk). I keep a shaker jar of baking soda and a squeeze bottle of H2O2 under my kitchen sink at all times  :) Make a paste with the two to clean darn near anything. It works wonders on making my sink shiny and will remove burn marks from pans.

It is really simple to make a shaker top for your jar. Using a small drill bit and your drill, make holes in a waxed ring lid.


To keep the baking soda from absorbing mosisture and clumping or getting tipped overed and spilling you will need to put a standard canning lid over your shaker lid and then secure with a lid. When ready to use, remove the band and top lid, then resecure the band to keep the shaker lid in place.

Wednesday, May 2, 2012

How To: Clothes Line Basics

Have I convinced you to line dry your clothes? Good! Here is how to do it :)

First, select your location. I have lots of sturdy trees, so I chose to stretch mine between trees. If you don 't have trees, you can set posts in concrete. I have three lines stretched. You can barely see them when they aren't filled with clothes.

To keep your line from sagging excessivly in the middle, you need to make sure you secure your line tightly. I picked up this neat gadget at WalMart. You insert the end of your line through it, hook the ring onto your hook, and pull your line tight. There are bearings inside that keep the line from slipping. Use this on one end and a regular hook on the other or youcan use one on each end if you don't know how to tie knots well.


Be sure to put the hooks a little higher than what you can reach from the ground. Use a small step ladder to screw in your hooks. Just make sure you can reach the line on your tippy toes. This way when your line is loaded with towels and sags in the middle it won't allow your towels to touch the ground.


How do you hang the clothes?

I do my pants like this:
Fold a little of the hem over the line and secure each leg with clothes pins at the edges.


I hang almost all collarless shirts like this:
Fold the end of the hem over the line just a little and secure each end with pins.

You get the general idea. Hang towels by folding a little hem over the line and secure with pins. Sheets should be folded in half length wise over the line.
Some people hang collared shirts on hangers and then put the hangers on the line. I just hang them by the shoulder seam and pin them.

There are some common concerns about using clothes lines.


What about your unmentionables?  There are several options. If you can streatch three lines parallel to one another, hang your undies on the middle line and they will be shielded from view by the clothes on the outer two lines.  I didn't have this options because I couldn't move my trees. I do have privacy fence that keeps my clothes line from being in view of anyone not in my back yard. And I don't invite people in the back yard when my unmentionables are on the line.  If you can't do either of those, you can dry them indoors, either on an indoor line or hanging in the shower.

What about rain? Watch the forecast. Schedule laundry day on a sunny, windy day if possible. Everyone is going to get suprised by an unexpected shower now and again. It won't be the end of the world, promise :)

What about bird poop? I have only had one bird bomb incident. I shook the dried offensive material off and rewashed the shirt. No big deal.

What about my delicate skin? I like the feel of stiff clothes off the line. If it bothers you, add a half cup of vinegar to the rinse cycle. Also, windy days will help. The wind moves the clothes as they dry and they will be really soft.

Give line drying a try. You might become a believer like me :)


Friday, April 13, 2012

Homemaker, Stay at Home (doggy) Mom, (future) House Wife, Unemployed...


Well the first day back from our vacation, I got notified that due to an ongoing consolidation of North American locations of my company I was out of a job. So as of late last week, I am a full time homemaker. My feelings are so mixed about this turn of events. I started my first job when I was 13 years old and, other than a few weeks during transitions, I have always worked.
Jason's advice is to enjoy this time at home and focus on my college work for a little while. I appreciate him so much. He is so supportive.

So for the time being I have a ton of projects that I am going to work on at home. I am excited for the opportunity to spend some time making our home a nicer, more organized, happier place. :)

Wednesday, March 7, 2012

"Surely the apple is the noblest of fruits." - Thoreau, Wild Apples

I have had several people ask me about canning apple sauce and apple butter. This website gives the best directions I have ever seen. I could do a whole post about it, but why beat a dead horse? Go here. Learn something. Make yummy food for your family. :)

http://www.pickyourown.org/applebutter.htm

I learned that if you pester your wonderful, sweet, adoring, doting, and handsome boyfriend about bringing you apples, he might just bring you more than what you can reasonably deal with in a short amount of time. Especially if you have a pressing project at work and a sickly mother. Anyone need a few apples? ;) After putting up 35 jars of apple sauce and 45 jars of apple butter, I am nearly tired of looking at apples. And I still have enough to can some apple pie filling, dehydrate some apple chips, and make a few pies. After all, "Good apple pies are a considerable part of our domestic happiness." -- Jane Austen.

Sunday, January 29, 2012

Tastes like Love

I made a cake tonight that reminded me VERY much of a chocolate cake that my Mamaw Mae and I used to make. It had to taste the batter and the first thought that came to my mind was "That tastes like love!" My Mamaw Mae showed her love in many ways. One of those ways was by letting me cook with her. I encourage you to try this recipe with the little ones in your life.

Vinegar Cake
3 cups flour
2 cups sugar
6 Tbs cocoa
1 tsp salt
1 tsp soda
2 cups water
2 Tbs vinegar (I used cider vinegar)
1 tsp vanilla
2/3 cup vegetable oil

Shift dry ingredients together. Stir liquids into dry ingredients and mix well. Hand mix is better than using a mixer for this cake.
Pour into a greased and floured 13x9 pan and bake at 350 for 30-35 minutes.

Notice that this cake doesn't use egg. You can let your kiddlets lick the bowl and not freak about raw egg :)

And what is a good chocolate cake without a good icing?? Here is how I make mine:
Soften 1 stick of butter or margarine. Add 4 Tbs cocoa. Add powdered sugar and a dab of milk and vanilla until it looks right. I can't tell you exactly how much because I don't really measure. Just eyeball it. And maybe test now and then to see if it tastes right.