Sunday, December 5, 2010
Fresh Start
I have started a new blog and done away with the old one. I have copied a few of my favorite posts from the old blog so I wouldn't lose the things I wanted to keep. I PROMISE to do a better job of updating this blog. :)
Jar Toppers
As promised: How To Make A Jar Topper
I love making things, even though I am not very crafty. These jar toppers are simple to make and make your homemade jams just a little more special.
First you will need fabric. I bought mine at Wal-Mart as a remnant. I was able to get enough fabric for 12 or so toppers for about $1.50.
You will also need string, ribbon, or twine.
Find a rubber band or hair elastic to be an extra set of hands for this project.
Oh, and you will need your sewing scissors.

Cut your fabric to the size you want. Since my fabric was a pattern of squares, I didn't have to measure. I just followed the pattern and cut 6 by 6 squares.

Then fold your fabric in half and then half again. Then clip the raw corner to make it rounded.

Use your rubber band to secure the fabric over your jar and adjust until centered.

Tie the ribbon or twine around the top to secure the fabric in place. Add a decorative label tag if you like. I printed mine from http://www.domestifluff.com/
Roll the rubber band off the bottom and admire your pretty jar!

Jammin'
I recently started making jam. I had an old water bath canner from who knows where in my storage room and thought I would give it a try. I have now made several successful batches of jam. Wanna try?
The most important thing is to gather ALL the ingrediants and tools that you will need. Once things get rolling there isn't time to hunt for anything.

- A jar lifter is essential for picking up and moving hot jars as well as lowering them into the boiling water.
- The lid wand has a magnetic end and is used for picking up lids from the hot water and keeping them sterile. Lids should be kept in hot, but not boiling, water until ready to use. This helps to prepare the sealant on the jar lid to adhere to the jar as well as helps keep the lids clean.
- The measuring tool lets you easily measure the head space. Head space is the distance from the food level to the top of the jar. It is very important to have the correct head space when perserving food. I also use this to removed trapped air from the sides of my jars.
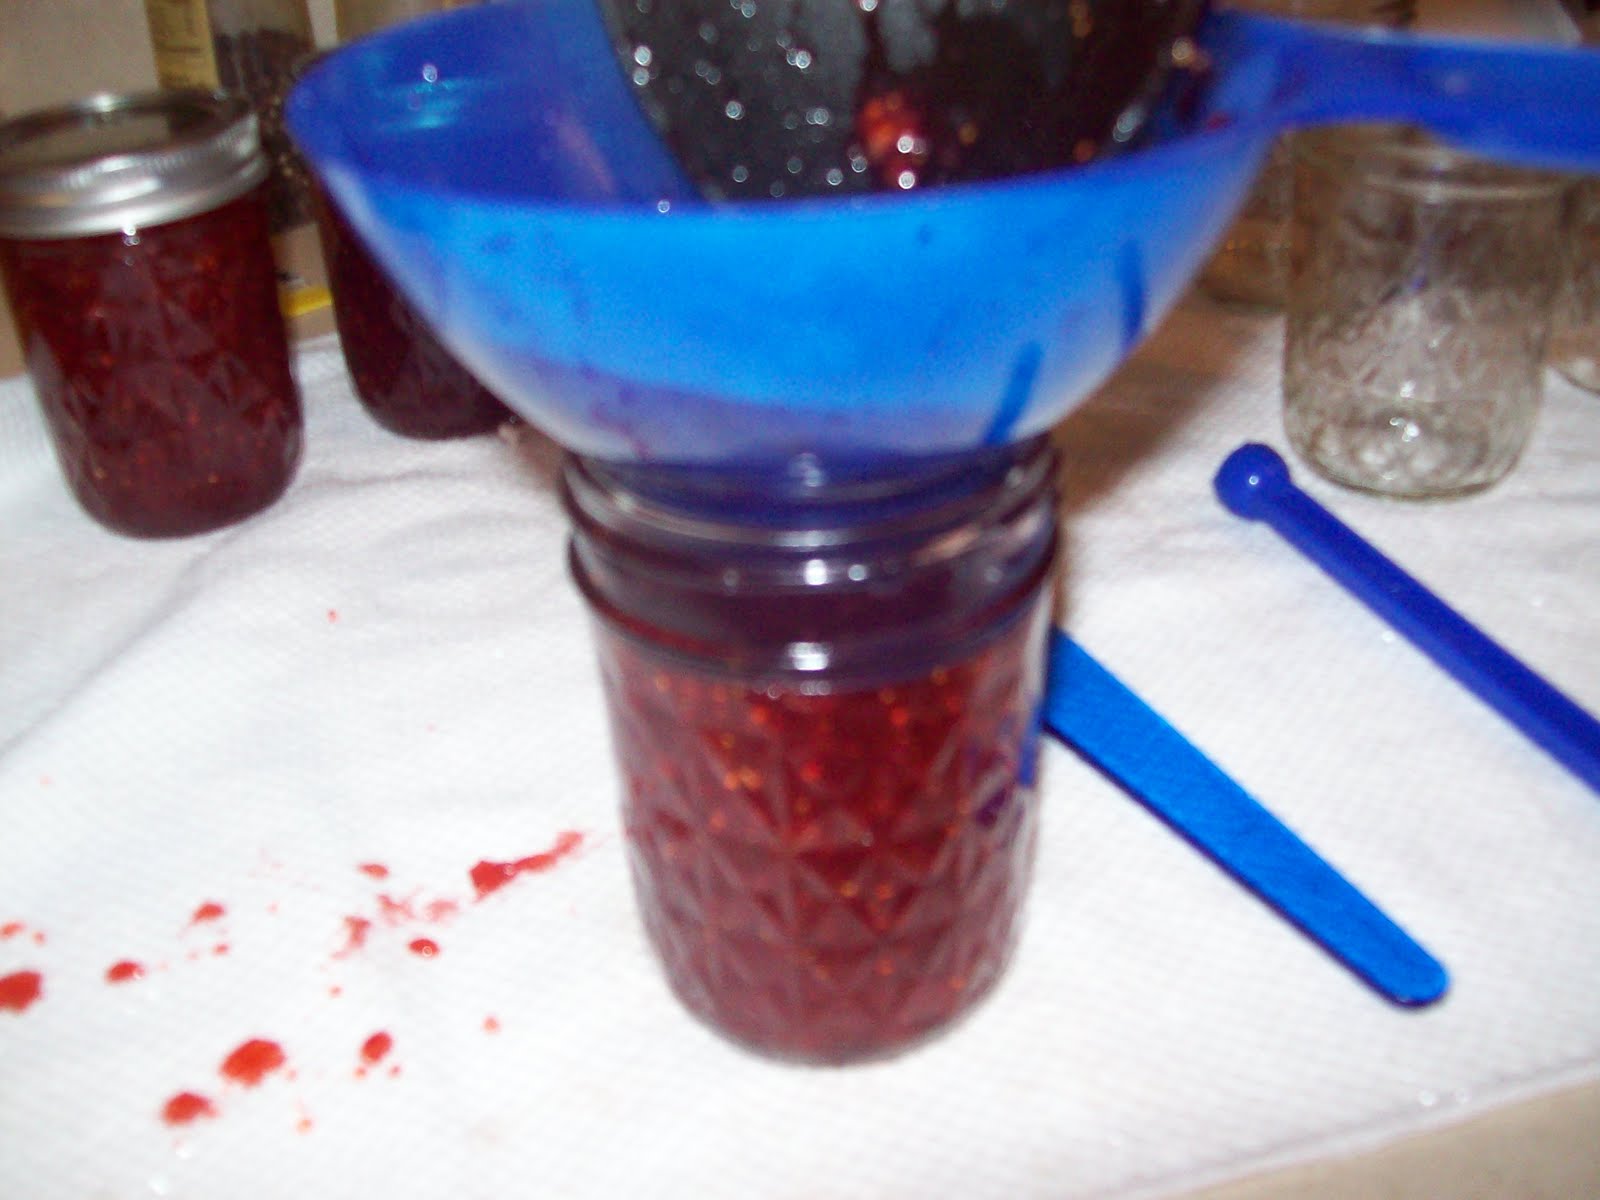
- The wide mouth funnel helps when packing the food into the jar. It is VERY IMPORTANT to keep the top and sides of the jars clean. Otherwise the lids will no seal properly.
You must start with clean jars. Place your clean jars into a boiling water bath for at least 10 minutes. I leave mine in until I am ready to pack them. You always want to pack hot jam into hot jars.
For this jam you will need:
3 pints of strawberries

1/2 tsp butter
If you don't know what a 1/2 tsp of butter looks like then I can't help ya :)
1 package of powered pectin (1.75 ounces)

7 cups of sugar

Wash, drain, and hull your berries. I use a food processer to crush mine, but if you like chunks of fruit in your jam then you can use a potato masher. You will need about 5 cups of crushed berries. Put these in a large, heavy bottomed pot on the stove. Add the butter and pectin.
Heat on high heat, stirring constantly until the mixture comes to a boil. Add the sugar all at once. Contiue stirring until the mixture come to a full rolling boil for 1 minute. Remove from heat and skim the foam off with a spoon.

Using the wide mouth funnel, pack the hot jam into your hot jars, leaving a 1/4 inch headspace. Be certain to wipe any drips of the tops and sides of your jars.

Using the lid wand, remove a lid from your hot (but not boiling) water and place it on the jar.

Screw a band to just hand tight on top of the jar and add to your boiling water bath. Continue until you have filled all jars.
Process the jars for 5 minutes in boiling water. Start timing ONLY after the water has returned to a full boil. The entire jar and lid must be under water. It is important to use a wire rack so keep the jars off the bottom of the bath so that water can circulate all the way around the jar.

Remove the jars from the bath and place right side up on a towel to cool for 24 hours. After 24 hours remove the bands and check the lid for a good seal. Push down on the middle of the lid. It shouldn't give. Try a gentle pull on the lid. It should not come off easily with your finers.
Save your bands and jars for reuse. DO NOT TRY TO REUSE YOUR LIDS. They are made for single use only and may not seal properly a second time. No need to sicken or kill your family for a 10 cent lid.
Enjoy your Strawberry Jam. This recipe makes about 10 half pints.

I plan on making cute jar toppers and labels for my jam. I will post a tutorial on that later on.
The most important thing is to gather ALL the ingrediants and tools that you will need. Once things get rolling there isn't time to hunt for anything.

- A jar lifter is essential for picking up and moving hot jars as well as lowering them into the boiling water.
- The lid wand has a magnetic end and is used for picking up lids from the hot water and keeping them sterile. Lids should be kept in hot, but not boiling, water until ready to use. This helps to prepare the sealant on the jar lid to adhere to the jar as well as helps keep the lids clean.
- The measuring tool lets you easily measure the head space. Head space is the distance from the food level to the top of the jar. It is very important to have the correct head space when perserving food. I also use this to removed trapped air from the sides of my jars.
- The wide mouth funnel helps when packing the food into the jar. It is VERY IMPORTANT to keep the top and sides of the jars clean. Otherwise the lids will no seal properly.
You must start with clean jars. Place your clean jars into a boiling water bath for at least 10 minutes. I leave mine in until I am ready to pack them. You always want to pack hot jam into hot jars.
For this jam you will need:
3 pints of strawberries

1/2 tsp butter
If you don't know what a 1/2 tsp of butter looks like then I can't help ya :)
1 package of powered pectin (1.75 ounces)

7 cups of sugar

Wash, drain, and hull your berries. I use a food processer to crush mine, but if you like chunks of fruit in your jam then you can use a potato masher. You will need about 5 cups of crushed berries. Put these in a large, heavy bottomed pot on the stove. Add the butter and pectin.
Heat on high heat, stirring constantly until the mixture comes to a boil. Add the sugar all at once. Contiue stirring until the mixture come to a full rolling boil for 1 minute. Remove from heat and skim the foam off with a spoon.

Using the wide mouth funnel, pack the hot jam into your hot jars, leaving a 1/4 inch headspace. Be certain to wipe any drips of the tops and sides of your jars.
Using the lid wand, remove a lid from your hot (but not boiling) water and place it on the jar.

Screw a band to just hand tight on top of the jar and add to your boiling water bath. Continue until you have filled all jars.
Process the jars for 5 minutes in boiling water. Start timing ONLY after the water has returned to a full boil. The entire jar and lid must be under water. It is important to use a wire rack so keep the jars off the bottom of the bath so that water can circulate all the way around the jar.

Remove the jars from the bath and place right side up on a towel to cool for 24 hours. After 24 hours remove the bands and check the lid for a good seal. Push down on the middle of the lid. It shouldn't give. Try a gentle pull on the lid. It should not come off easily with your finers.
Save your bands and jars for reuse. DO NOT TRY TO REUSE YOUR LIDS. They are made for single use only and may not seal properly a second time. No need to sicken or kill your family for a 10 cent lid.
Enjoy your Strawberry Jam. This recipe makes about 10 half pints.

I plan on making cute jar toppers and labels for my jam. I will post a tutorial on that later on.
Back to School

As of today, I am officially a student of the UALR College of Engineering and Technology. I know what you are thinking...how many majors have you had now? BUT, this is the one I will finish. My manager at work wants me to do this program, and I want the money I will make after I finish this program, and I like the security that an engineering degree provides.
So I pulled out my trusty backpack and am filling it with school supplies. I know I am a nut, but I think school supplies are so much fun to buy. Those new pencils and notebooks just SCREAM with promise and ambition

I am VERY ashamed to show the current state of my desk in my home office, but maybe it will shame me into cleaning up this MESS. I think it is VERY important to have a clean desk to start the semester off right.

So if I seem a bit stressed the next few months, please forgive me. Between working full time, going to school nearly full time, and keeping a home, I might be a bit frazzled.
Certified Quality Auditor

On June 5, 2010 I took the 5 hour American Society for Quality Certified Quality Auditor Exam. As you can see from the nifty logo up top, I PASSED! I am pretty excited about earning my first ASQ certification. I am trying to decide if I should test for my Certified Quality Engineer exam in December, or wait for a year. Since I am going back to UALR in the fall to continue my Mechanical Engineering Degree, it may be better to wait. We shall see... But in the mean time, I PASSED! :)
Home Made Laundry Soap
I NEVER buy laundry detergent anymore. Thanks to the AWESOME Duggar family, and a friend who introduced me to recipe, I can now make 10 gallons of laundry soap at a time, for around $2.
Here is the link to the Duggar family recipe:
www.duggarfamily.com/recipes.html
I am posting pictures of myself making this tonight just as a visual aid.

The basic materials are borax, washing soda, and Fels-Naptha bar soap. I bought my Fels-Naptha at the Kroger on Geyer Springs. You can also order it online. I haven't found it at Wal-Mart, yet.

You grate the soap using a food grater, or you could probably use a food processor. I like getting my arm workout though.

Heat your 4 cups of water in a heavy bottom pot and then add your grated soap. Stir until all melted.

Fill a 5 gallon bucket half full of water. Add your melted soap, 1/2 cup of borax, and 1 cup of washing soda. Stir until all powder is dissolved.

Then you fill the bucket to the top with hot water, stir, cover, and allow to sit overnight to gel.
When you are ready to use, take a clean empty container and mix half of the mix and half water and then shake it up. Use 5/8 of a cup per load. My big bucket lasted almost 6 months, and I do a lot of laundry!
I will be happy to provide a sample to anyone who lives close to try!
Sisters
I think my best friend has always been my sister.

Brandy was born on my second birthday. I wasn't thrilled about that fact until MANY years later. I ALMOST had to go to a daycare that day, for the first time EVER. But our great-grandmother threw a legendary hissy fit and I got to go stay with her instead. She wasn't about to have her baby girl be watched after by strangers, especially on this important day. :)

We were VERY different when we were young. She was outgoing and I was shy. I remember when we would have to sell candy for sports fundraisers. Back then you would still go door to door in your neighborhood. Since we lived OUT in the woods, we would sell in our great-grandparents 'hood. We agreed that I would carry the boxes on my bike, and she would do all the talking. One house for her box, the next for mine.

She was a TOMBOY and I was a girly girl. At Christmas, we would often get similar gifts, but she would get the 'boy' version and I would get the 'girl' version.

That poor frog had yarn tied to his leg because I wouldn't actually touch the frog, but Brandy insisted that I take my turn playing with him. :)
As we got older, we would fight like cats and dogs, but if anyone said BOO to her, they had to go through me. And she loved me to. The big mean girl from across the way once knocked me down and was hitting me, because she was big and mean. My little sister jumped off the tetter totter and jumped on mean girl's back and started pulling her hair and yelling, "Get off my sissy!!" We always have each other's back.

I plan on writing a post about Brandy soon, but had to share a bit about her now. She is and always will be my best friend.
Salmon with Mustard Sauce and Asparagus
So, I got some flak from my baby sister about making 'elaborate' meals. This post is to share a delicious recipe and to show her how easy it really is to make a healthy, yummy meal at home. This isn't my original, but I don't remember when I got the recipe, so my apologies to the author.
Roasted Salmon with Mustard Sauce and a side of Asparagus
1/2 cup Dijon mustard (I use Grey Poupon)
1/4 cup sugar
2 tsps white wine vinegar
2 lbs fresh asparagus
coarse salt
fresh ground pepper
4 salmon steaks
1 Tbs olive oil, plus extra for grilling pan
-Preheat oven to 450 degrees.
-Mix mustard, sugar, and vinegar in a small bowl. Put half in a separate bowl for basting and reserve the other half for drizzling at presentation.
-Season salmon steaks with salt and pepper. Using a brush, lightly baste each side with the mustard sauce. Place on baking sheet and roast until cooked through, about 10 - 15 minutes or so.
-Meanwhile, in a large bowl, toss asparagus with oil and season with salt and pepper. Grill (or use heavy bottom skillet on stove), turning occasionally until brown and tender (I like my asparagus slightly crisp).
-To serve, place salmon on large platter and drizzle with reserved sauce. Add asparagus to platter and serve. I sometimes add baked potatoes and fresh made garlic bread, since we are meat and tater people :)
The cost breaks down like this:
asparagus: $3.99
salmon: $4.00
grey poupon $1.13
oil $.10
vinegar $.10
sugar $.05
salt and pepper $.03
for a total of $9.40 / 4 servings gives $2.35 per serving.
A reasonable price for a delicious, healthy meal created with love.
Mom

I have been thinking about my Mom alot the last few days. My Mom is probably the person I am most alike in my family. We look alot alike, we think alike, we both stomp our foot just alike when we get really really frustrated. We both like warm pjs and a slightly cool room. We both HATE when our homes are dirty or disorganized. We are both just a tiny bit grumpy when we are tired. We are just two peas in a pod....but it wasn't always that way. Mom and I went through many years when we weren't close at all. I am so thankful to my Heavenly Father for the mother He sent me to and for always watching our for both of us. I am glad we are so close now and hope that any daughters that I may someday be blessed with will always know the love of their Grammy. (yes, she has already picked out her name for her grandchildren). Mom has overcome many struggles in her life and I am so proud of her. I hope that I become at least half the lady she has become. I love her dearly and am very grateful for my Mom.
Subscribe to:
Posts (Atom)